Friday, April 30, 2010
Day Nineteen
Very little got done today. I tidied up a bit and started another motif, but other resposibilites took me away from the mosaic. I missed it!
Thursday, April 29, 2010
Day Eighteen
The adhesive sealer was very watery and somewhat odoriferous but seems to have set up well. I painted it on in the morning, opened a window to ventilate and left the room for a couple of hours.

I returned after lunch and happily sketched the general lines on the wall at last using pencil and my trusty rulers. I checked my already completed motifs in the actual spots and made a few adjustments. I still had time to set up one more motif and plan out the remaining four.


Wednesday, April 28, 2010
Day Seventeen
I am feeling a bit under the weather today - the Greenhouse was a bit on the chilly side yesterday. This morning we have snow - just a light dusting, which brings out really instructive views of the highlights on the foliage in the garden. It is not often that a garden in full spring glory gets snowed upon, although here in the Berkshires it happens more than we really like - freezing is not good for setting fruit! And it wrecks havoc with tender tree blossoms.
 Listening to Grisham's The Broker while forging ahead with the motifs was a great way to spend the afternoon, though I should have had the space heater at a higher setting and I should have put on my SmartWool socks earlier. https://www.smartwool.com/
Now I am headachy and sniffly.
Even so, I will paint the primer today. Milos has been tending the wall with great effort and precision. The surface is as smooth as a baby's bottom now. The heater is on and Milos has found me a good brush from his tool emporium.


Now I am headachy and sniffly.
Even so, I will paint the primer today. Milos has been tending the wall with great effort and precision. The surface is as smooth as a baby's bottom now. The heater is on and Milos has found me a good brush from his tool emporium.


Tuesday, April 27, 2010
Day Sixteen
The mesh arrived! I immediately got to work using the Weldbond glue to transfer the motifs I have saved with gum-back paper film. It was difficult to deal with the variations in tile thickness, but I solved that by slicing in with a utility knife to release the tiles that were too high up, adhering to the film and not making good contact with the mesh. It is good to put glue on both the tile and the mesh to ensure a good bond. The mesh and glue as well as many of the tiles were purchased from Mosaic Art Supply - see link below. Joe Moorman who handled my order is very responsive and friendly.


 http://www.mosaicartsupply.com/ceramicmosaictile.htm


Monday, April 26, 2010
Day Fifteen


I am up against a wall!

Milos has been working on the surface of the wall - or substrate. Since we ditched the idea of adding a slab of plywood, he has been trying to make the surface tile ready, using spackle to level out the uneven parts. We had a discussion about whether using bin paint primer would be a good idea. We decided no. The adhesive primer will be fine. We hope.
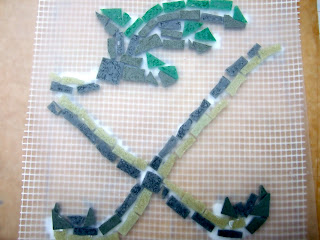
I then continued making up motif segments. Here you can see corner designs - the back side of one and the front side of the other - from the inner central area just to the left and right of the arch. I sure hope this method will work out. I need that mosaic mesh to arrive soon!
Sunday, April 25, 2010
Day Fourteen


Saturday, April 24, 2010
Day Thirteen
Making mosaic makes sense for me...
it combines several of my artistic preferences and personality traits.
Artistic
- color: variations, combinations and relationships, the use of transparent and opaque colors, fascination with effects of glass reflectivity and transparency (window and mirrors, crystals)
- piecing shapes, as in puzzles, making clothing and knitting patterns, weaving beads... discovering the keys to making all parts work together in unity to make a cohesive whole (I do a daily "evil" Sudoku: the sudoku site I use)
- planning a design on strong geometrical foundations, measurement and applied math - ratio and proportion
- awareness of line to create unity, visual flow and movement
Personality
- taking risks in trying new ways of expression
- creating a stable environment
- having a sense of history: past, present and future
- desire to conquer psychological fear (it is interesting to me at least that I have gone from learning to spin wool (soft soft soft non-threatening) to cutting glass (sharp sharp sharp very threatening)
- being physically active in a non-competitive way
Friday, April 23, 2010
Day Twelve

Now, while I am waiting for my mosaic mesh and pvc glue to arrive, I can still start planning out the arrangements for each motif in "opus vermiculatum" keeping in mind the art nouveau principles (see Day Eight).


I can't forget to mention I made a video of myself cutting glass. Click on How To Cut Glass for a Mosaic to see me demonstrate at my website.
Thursday, April 22, 2010
Day Eleven


 I had to really get busy cutting glass and grew more and more comfortable with the cutting machine. I love that the machines I use are not electric. I like a quiet workspace so that I can listen to the radio or a book on tape while I do the routine work. I usually need quiet to think through the initial conceptualizing and measuring however, though I am able to filter out a lot. I made a video of how I cut the class that I have put on my www.artrebecca.com website under "Art Demonstrations."
Wednesday, April 21, 2010
Day Ten


Tuesday, April 20, 2010
Custom Jewelry

in case you would like to see more variety.


Day Nine


All in all I am very happy with the materials.

I also watched several others - this one was very good for the design inspiration
http://www.youtube.com/watch?v=Yb_NhaLtpQk&feature=related
After dinner I started planning my grid. I divided up my design in 30 cm equivalent segments (on my drawing 3.5 cm equals 1 foot - not the best scale! Next time I will be smarter and do all my measurements in cm which are easier to divide. Unfortunately the tiles come in inch measurements - I had had to convert everything to square inches for ordering.) I then used parchment paper to work on the segment number one. This is the design at the far left with the flower pot. It not only is way to the left and is a good place to start - not too obvious or noticeable but symbolizing the place the growth begins. My skills will be growing, starting with the pot. Now I chuckle - today April 20th is some kind of pot holiday I read on Huffington http://www.huffingtonpost.com/

Monday, April 19, 2010
Day Eight
I am trying to understand the essence of art nouveau - what makes art nouveau different and recognizable. I picked up Owen Jones' The Grammar of Ornament to see if it has art nouveau and discovered it was compiled mid-nineteenth century, too early for a.n. However, many figures and motifs in the designs - asian, moorish, medieval, celtic and all - have a distinct influence on the a.n. designs - in the colors, the individual figures, and the use of space. What makes art nouveau art nouveau I realize is: 1. incremental sizes: a motif or figure is not always repeated precisely in the same proportions; 2. incremental spacings: the gaps between design elements increases and decreases; 3. segments "off the grid" - diagonals and curves enliven the surface; and 4. regular and irregular variations: a repeated shape in a cluster might be overlapped here, separated out and slightly bigger or differently colored there et cetera. Art Nouveau designs, because of these techniques integrated into more strict geometrical use of space (opus quadratum) create a sense of life and motion. This week when I will be starting to plan the tile lines and placement, I will keep these principles in mind. My stems will be laid opus vermiculatum. I will also make sure that my spaces left for grouting will be planned carefully for movement, line and color.
This afternoon I will seal the grouting from the main walls of the room with grout sealer - a runny clear liquid that absorbs into the grout and protect it from deterioration.
This afternoon I will seal the grouting from the main walls of the room with grout sealer - a runny clear liquid that absorbs into the grout and protect it from deterioration.
Sunday, April 18, 2010
Day Seven


Saturday, April 17, 2010
Day Six
Another book on mosaics I ordered arrived from England today - I guess it got out before air traffic was stopped. It is very clear - Beginner's Guide to Mosaic by Peter Massey and Alison Slater. Picking up tips already from their very clear step by step images, I have decided I will create the more detailed artistic elements of the mosaic "opus vermiculatum" using mosaic mesh, working flat on a table, and then transferring the tiles on the mesh to the wall-mounted plywood. I will then fill in the background in a more gridded fashion using the "opus quadratum" or the "opus tessalatum" technique of laying tiles. Time to look into buying mesh.
Friday, April 16, 2010
Day Five


 I was happy to hear that the knock off mockup I made for my daughter Jean of a top she loves the fit of but finds the fabric too flimsy was a success. It fit just right and she says she can't believe I call it a mockup. (see photos)
There is not much mosaic progress today - we are waiting for deliveries and backpedaling. Amazon is having trouble processing our credit card for the purchase of the nippers and we don't know why. I just reentered the credit card information - which by the way was good enough for many other recent purchases including the mosaic book and we are nowhere near our credit limit.
There seems to be a dark cloud over more than northern Europe.
I even dreamt last night that I was in New York City getting on a train and a tall man grabbed my purse and manhandled my credit cards, stealing the very one that is now not working at Amazon.
Yesterday morning I went to the home of a custom clothing customer. She loves tiles and has many incorporated into her interior decor, including French and Spanish. The design theme of her home is "Monet". She even has a pond out back with a bridge just like the one at Giverny. I felt very much in my element.
I also had a chat with my good friend Sue who had been visiting mosaic supply sites online looking for mirror backed tiles. She didn't even know about my mosaic project or my blog. We had a good laugh over the coincidence.
Creatively I worked on touching up one of my illustration paintings (images show before and after) and tweeking until I was ready to keel over technical issues with the poster design for the Berkshire Bach Society spring concert:
Subscribe to:
Posts (Atom)


